Blocking out the level
Blocking out a game level is the process of laying out a level as quickly as possible while still being playable in the game. Objects are created and placed for functional and not visual reasons. Usually, texturing, lighting, and detailed geometry are not part of level blocking, but, since these aspects can be a part of, or affect, game play, they will sometimes be included in this phase.
Setting up the grid
The first thing we do is to set up the grid to match across our tools so we can work consistently and more easily. The grid you use in your 3D app should match the grid in the 2D app and the game editor. So, a 512 × 512 cube should snap onto a power-of-two grid in your 3D app, the texture you map to it should fit perfectly on it, and both should snap into place in the game editor (see Figure 5.5). A primary benefit of this.
Basic parts
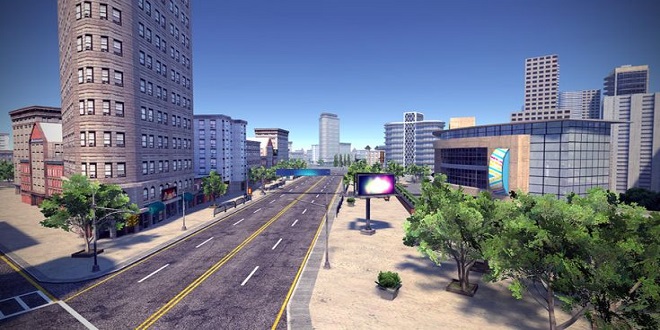
A city is fundamentally created with very basic shapes; in fact, most of these objects are cubes. You can see in Figure 5.6 that the intersection of this city street is nothing more than a handful of cubes with a texture laid over them. In Figure 5.7, you can see that even the simplest addition begins to create a city feel. If you look at almost any city street, you will also further notice that it is the ground floor that contains most of the
World measurements and scale
Early on, the designers of the game should know the measurements of all the players’ available moves. The measurements of every dynamic aspect of the game should be known. If the player can run, how fast can he or she run? How far can he or she run? If he or she can jump, how high and how far? Does he or she jump farther if running? You get the idea. You may be involved in figuring out these measurements, but you can’t effectively start building the game without them. If you get too far along without this information, you will undoubtedly have a lot of reworking to do. It happens in development that these numbers may change, but a lot of thought must be put into such a decision.
Modeling the streets
Do we start with a box? Do we extrude a line? It really doesn’t matter. After practice, you will know the best way to get to your end goal. In the case of such a simple mesh, it really doesn’t matter how you start but how you end. As long as the mesh is solid and accurate, you are okay. However, one factor to consider in choosing one way to start your mesh versus another is the speed in which you will finish it. In this case, I started with a spline because starting with a box would have required more steps to complete the mesh.
UV-mapping the meshes
I am introducing UV-mapping here and now. While UV-mapping is often treated as a separate step, I usually UV-map as I work. I do this to avail myself of opportunities to save time and effort, and two ways to do that are by UV-mapping repetitive objects and UV-mapping objects before they are manipulated. Most people hate UV-mapping meshes, and I am no exception. The only thing that pushes me to take my time and do the best I can is the fact that good UV-mapping makes a huge difference in how good the final mesh looks in the game and how efficiently it functions.
Conclusion
For a final touch, I took the edge of the bottom-most floor section and pulled it down to the base of the garage. This made the first floor solid and made the entire building look more substantial. Don’t forget to delete all the faces under the floor section that are now unseen. Props and decorations often take the most time in planning and creation, but these details convey the most information about an environment.